top of page

Programming ESP32 with Arduino
As we discussed on our previous course 'ESP32 - Getting Started' it was mentioned that one of the ways to program the ESP32 is by using the Arduino IDE. We will discuss this step-by-step in this module. You should be familiar with Arduino to get along with this course. You can visit our course on Arduino where you will learn how to install the Arduino IDE we will be using here.
Requirements:
-
Arduino IDE version 1.8 or later version should work just fine.
-
Windows 10.
-
ESP-WROOM-32 board.
For us to make the ESP32 work with with Arduino software, we need to install the ESP32 Arduino core. This involves adding an additional source to the Arduino IDE Board Manager and then install the ESP32 boards.
First, let's add the source to the Board Manager by following the steps below:
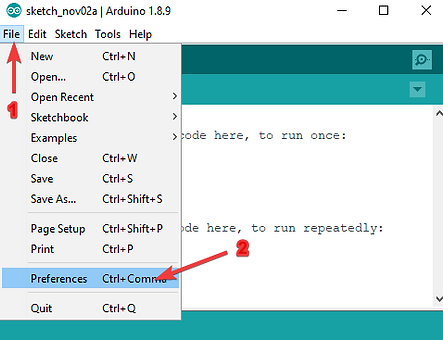
1. Go to the menu bar on your Arduino IDE then click File. You should see a drop down menu with different options.
2. Click on Preferences. A new window should pop up showing the Settings tab by default.
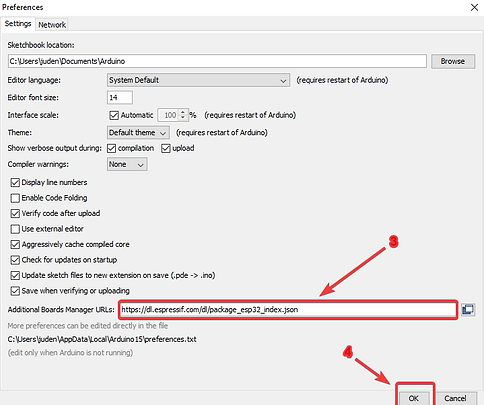
3. Copy this URL "https://dl.espressif.com/dl/package_esp32_index.json" and paste it on the textbox labelled "Additional Board Manager URLs"
4. Click on the OK button to save the setting.
Next, we will install the ESP boards with the following steps:
-
Go to the Arduino IDE menu bar then click on Tools. You should see a drop down menu.
-
From the drop down, go to where you have Boards "Arduino/Gernuino Uno" another window should pop up showing list of installed boards.

3. From the pop up, click on "Board Manager..." at the top.
4. Another window should pop up. In the search bar on the Board Manager window, enter "esp32".
5. You should see an entry for "esp32 by Espressif Systems". Highlight this entry and click on the Install button.
Your ESP32 boards should start installing (this should take a few minutes). Click Ok when done.

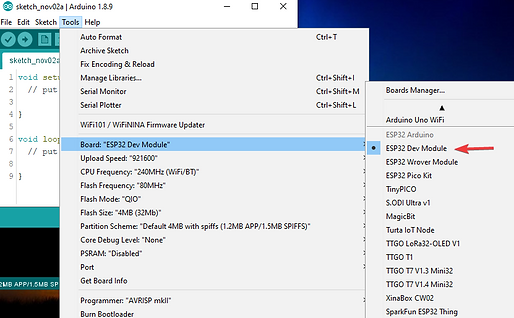
If you head back into the Boards submenu (Tools -> Boards), you should now see a number of ESP32 boards. You'll need to select the board that matches the ESP32 board you have purchased. since we are using ESP-WROOM-32 board, we will select ESP32 Dev Module.
Blinking LED with ESP32
As we all know, blinking LED is to a new microcontroller project as "Hello World!" code is to a new programming language you are working with for the first time (don't ask why: it's just tradition LoL).
We will be writing Arduino sketch to blink the inbuilt LED on the ESP32 board.
1. Type the code below into your Arduino IDE:
int LED_BUILTIN = 2;
void setup() {
pinMode(LED_BUILTIN, OUTPUT);
}
void loop() {
digitalWrite(LED_BUILTIN, HIGH);
delay(1000);
digitalWrite(LED_BUILTIN, LOW);
delay(1000);
}
The blink code for the ESP32 is very similar to the traditional Arduino blink program so there is not much to explain. The inbuilt LED connected to pin2 of ESP32 instead of pin13 such as in the Uno.
2. Click on the 'Verify' button to check for any errors in your code.
3. Plug in your ESP32 board to your computer via the appropriate USB cable. Select the appropriate port (Tools -> Port).
4. Click on the 'Upload' button on your Arduino IDE (this should take slight longer than when uploading to a traditional Arduino board).
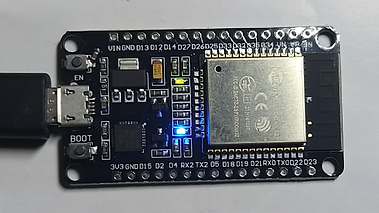
5. When your code is done uploading to your ESP32 board, the onboard LED on your ESP32 should start blinking as expected.
bottom of page