top of page

Bluetooth With ESP32


One of the reasons ESP32 is so desirable is it's inbuilt Bluetooth and Wi-Fi capability. The inbuilt functionality is also one of the advantages the ESP32 has over its predecessor the ESP8266. This functionality makes it possible for the ESP32 board to connect to other Bluetooth devices making suitable for IoT projects.
Bluetooth and Bluetooth Low Energy on ESP32
The ESP32 has both classic Bluetooth and Bluetooth Low Energy, or BLE for short functionality. It can ack as either a Bluetooth client or server.
Classic Bluetooth 4.2
Classic Bluetooth as the name implies is the "traditional Bluetooth" we are most likely familiar with. Classic Bluetooth is used for continuous data transfer. It is the one that we see in our wireless audio applications, computer peripherals such as mice and keyboards, and for exchanging files between devices wirelessly.
Bluetooth Low Energy (BLE)
Bluetooth Low Energy exchanges data in short bursts. from the name; it consumes very little current, making it very suitable for embedded applications whose main aim is energy preservation. BLE is also ideal for remote sensors and IoT devices, as these applications only require short bursts data and are often battery-powered. We will focus on BLE in this course module.
Now, let us test the Bluetooth on our ESP32 board. To do this, we will make use of a sample Arduino sketch using the following steps:
1. Plug your ESP32 Board to your computer via suitable USB.
2. Go to File -> Examples -> BluetoothSerial -> SerialToSerialBT
(go to "Tools -> Boards" : make sure your is set at "ESP32 Dev module")
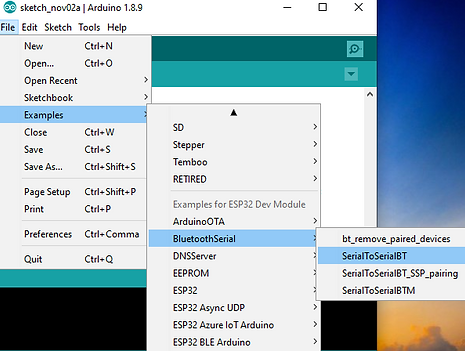.png)
3. Upload the sample sketch to your ESP32 board. (Remember to set the baud rate on the Serial monitor to the same on the sample program (which in this case is "115200").
#include "BluetoothSerial.h"
#if !defined(CONFIG_BT_ENABLED) || !defined(CONFIG_BLUEDROID_ENABLED)
#error Bluetooth is not enabled! Please run `make menuconfig` to and enable it
#endif
BluetoothSerial SerialBT;
void setup() {
Serial.begin(115200);
SerialBT.begin("ESP32test"); //Bluetooth device name
Serial.println("The device started, now you can pair it with bluetooth!");
}
void loop() {
if (Serial.available()) {
SerialBT.write(Serial.read());
}
if (SerialBT.available()) {
Serial.write(SerialBT.read());
}
delay(20);
}
The sketch is fairly simple, because the "BluetoothSerial" library does most of the job for us. The function of the above program is to exchange data between the Arduino IDE and an external Bluetooth Serial Terminal. With this program, through ESP32 you can type a text on your Arduino IDE Serial monitor and it will appear on your mobile phone via a Bluetooth Serial Terminal App.
4. Before we continue, let us install our Bluetooth Serial Terminal on our mobile. We will be using the "BT Terminal" application which is available for free on the Google Play Store.
5. After installing our BT Terminal app, turn on you Bluetooth an your mobile device and search for available devices: you should see "ESP32test" among the listed available devices. Pair it with your mobile Bluetooth.
6. Open the installed BT Terminal app. You should see three buttons: "Connect", "Disconnect", "Send" and "Clear". Click on "Connect". You will see a page with paired Bluetooth addresses.

BT Terminal App Interface
Our ESP32 address should be something like "58:BF:...:FA ESP32test". Tap on the address and you should be connected.
7. If your connection is successful, tap on on the input section labelled "Tx>>". This should pop up you keyboard for typing.
8. After typing anything, click send. What you typed should appear your Arduino IDE Serial monitor.
9. Also, if you type in the text dialog box on the Serial monitor then click "Enter", it should appear on the section labelled "Rx>>" on the BT Terminal app.
Controlling LED Using ESP32 Bluetooth
We have seen above how we can send text to the Serial monitor to the BT Terminal app on our mobile through ESP32 using Bluetooth, and vice versa. Now, we will look at how to actually control devices such as an LED connected to the ESP32 via Bluetooth.
Using the same code above with a few tweaks and little additions, we will control the onboard ESP32 LED using the BT Terminal and also the Serial monitor via Bluetooth. We will write a code to turn ON the LED if "1" is sent
to ESP32 and to turn OFF if "0" is sent to ESP32 via Bluetooth.
In the code, we will create an empty variable "blueVal" (Bluetooth value) to store the characters 1 and 0, then we will set the SerialBT.read() function to always check for the current character in the "blueVal" variable to execute the "if statement" and turn ON or OFF the LED accordingly.
Code:
#include "BluetoothSerial.h"
#if !defined(CONFIG_BT_ENABLED) || !defined(CONFIG_BLUEDROID_ENABLED)
#error Bluetooth is not enabled! Please run `make menuconfig` to and enable it
#endif
BluetoothSerial SerialBT;
char blueVal;
void setup() {
pinMode(2, OUTPUT);
Serial.begin(115200);
SerialBT.begin("ESP32test"); //Bluetooth device name
Serial.println("The device started, now you can pair it with bluetooth!");
}
void loop() {
//signal from mobile
if (SerialBT.available()) {
blueVal = SerialBT.read();
Serial.write(blueVal);
}
if (blueVal == '1') {
digitalWrite(2, HIGH);
Serial.println("LED on");
}
if (blueVal == '0') {
digitalWrite(2, LOW);
Serial.println("LED off");
}
//signal from Serial monitor
if (Serial.available()) {
SerialBT.write(Serial.read());
}
}
With this, we can possibly control any peripheral connected to the ESP32 with our mobile device or the Arduino Serial monitor via Bluetooth.
bottom of page