
Raspberry Pi Operating System

Introduction
As with every computer system, you need a form of software to run the hardware. In the case of the Raspberry Pi, we will be using the officially supported operating system known as Raspberry Pi OS.
Raspberry Pi OS
Raspberry Pi OS (formerly Raspbian) is a Unix-like operating system based on the Debian Linux distribution for the Raspberry Pi family of compact single-board computers.
Initially developed in 2012 by Mike Thompson and Peter Green as Raspbian. It was an independent and unofficial port of Debian to the Raspberry Pi. The Rasberry Pi having no official operating system at the time, built on the work by the Raspbian project and began producing and releasing its own version of the software. The Foundation's first release of Raspbian, which now referred to both the community project as well as the official operating system, was announced on September 10, 2013.
On May 28, 2020, the Raspberry Pi Foundation announced a beta 64-bit version. However, this version was not based on Raspbian, instead taking its user space software from Debian GNU/Linux. Since the new OS was not based on the Raspbian project, the Foundation did not want to use the name Raspbian anymore. So, the name of the officially provided operating system was changed to Raspberry Pi OS.
Raspberry Pi OS is highly optimized to run on Raspberry Pi boards with ARM CPUs. It runs on every Raspberry Pi except the Pico microcontroller. Raspberry Pi OS has a desktop environment, PIXEL (short for Pi Improved Xwindows Environment, Lightweight), based on LXDE, which looks similar to many common desktops, such as macOS and Microsoft Windows.

Raspberry Pi OS Desktop GUI
Versions
Raspberry Pi OS is produced in three installation versions:
-
Raspberry Pi OS Lite (32-bit & 64-bit)
-
Raspberry Pi OS with desktop (32-bit & 64-bit)
-
Raspberry Pi OS with desktop and recommended software (32-bit)
Two legacy versions are recognized:
-
Raspberry Pi OS Lite (Legacy) (32-bit)
-
Raspberry Pi OS (Legacy) with desktop (32-bit)
Raspberry Pi OS Lite is the smallest version and does not include a desktop environment. The desktop version includes the Pixel desktop environment. Raspberry Pi OS with desktop and recommended software comes pre-installed with additional productivity software, such as Libre Office, and also comes with Python programming language.
Install Raspberry Pi OS on Raspberry Pi
Now that we have an idea of what the Raspberry Pi OS is, let us see how we can download and flash it into an SD Card for use with our Raspberry Pi.
Requirement:
-
Computer (Desktop/PC/MAC)
-
microSD card (8 GB minimum)
-
SD card reader
-
Internet connection
Download Raspberry Pi Imager
Raspberry Pi Imager is a quick and easy way to install Raspberry Pi OS and other operating systems to a microSD card, ready to use with your Raspberry Pi.
Click on the links below to automatically download your desired version of Raspberry Pi Imager:
Download for Windows
Download for macOS
Download for Ubuntu for x86
We are using a Windows-based PC for this tutorial (So, we will download our imager Windows version). Once the download is complete, you should have a .exe file in your downloads folder - version 1.7.4 was the latest version at the time of writing.
.png)
Raspberry Pi Imager .exe file
Install Raspberry Pi Imager on your PC
Follow these easy steps to install your Imager on your PC.
-
Double-click on the .exe file. A window should pop up with the install button - click Install.

-
Once you click on install button, the next window should appeare with the installation progress bar.

-
Once the installation is complete, a new window will pop up. On the new window, make sure the "Run Raspberry Pi Imager" option is toggled then click on the "Finish" button.

Flashing Pi OS into SD Card
Follow these easy steps to install your Imager on your PC.
-
Once the Imager is done installing, click the Finish button, you should see the window below - Your Imager is now set to flash your Raspberry Pi OS into the microSD card.

Screen 1 – Click (CHOOSE DEVICE)

Screen 2 – Click (Raspberry Pi 5)

Screen 3 – Click (CHOOSE OS)

Screen 4 – Click (Raspberry Pi OS - 64-bit)

Screen 5 – Click (CHOOSE STORAGE)
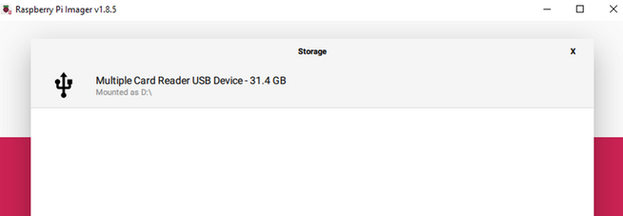
Screen 6 – Select (SD Card available)

Screen 7 – Click (EDIT SETTINGS)

Screen 8 – Edit accordingly (username: pi, password: raspberry)

Screen 9 – Click (YES)

Screen 11 – OS is writing to SD Card
Eject SD Card from PC and insert into the Raspberry Pi as shown:
