
Raspberry Pi Pico with
RGB LED
Introduction
We all must be familiar with multi-colored LEDs. Typical example: the charging indicator in my laptop displays a red color while charging, then turns white when the battery is full. That's a bi-colored LED.
In this tutorial, we take a step further and see how we can play with the values of a tri-colored LED using a Raspberry Pi Pico with a few lines of code to get almost any color of choice.
Requirements
-
Raspberry Pi Pico running MicroPython
-
Micro USB cable
-
RGB LED (common cathode)
-
220Ω resistors (x3)
-
Breadboard
-
Male - Male jumper wires (x4)
-
Thonny IDE
RGB LED
An RGB LED is basically an LED package that can produce almost any color. This is usually a combination of three LED colors (Red, Green, and Blue (RGB)) in a single package.
RGB LEDs have 4 legs rather than the usual two. Here, we'll be using a common cathode RGB LED which means that out of the four legs in our LED, one will be connected to GND and the other three legs will be connected to GPIO pins of the Pico.


There are also common anode RGB LEDs, which means that one leg needs to connect to a 3.3V pin, and the other legs need to connect to GPIO pins.
With either type of RGB LED, a resistor is needed for each pin that is connected to a GPIO pin. We will be making use of 220Ω resistors in this tutorial.
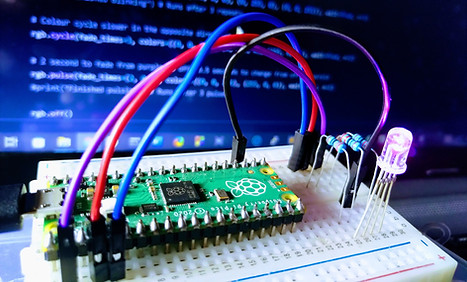
Hardware Assembly
Connection
Circuit

Programming
We can easily control the RGB LED using the picozero library. The code below will turn on the three RGB LEDs at once for a second, then turn them back off.
Python code: pico_RGB.py
from picozero import RGBLED
from time import sleep
rgb = RGBLED(red = 1, green = 2, blue = 3)
rgb.on()
sleep(1)
rgb.off()
Changing colors
Just turning on and off does not do justice to the cool color features of the RGB LED, so let's take things up a bit.
We can change the LED color by sending different values from 0-255 to any of the 3 RGB LEDs. 0 means turn off LED and 255 means full brightness - so if we want to turn on just the red LED, we will send 255 to red then 0 to green and blue LEDs. If we send 128 to RED, 0 to GREEN, and 128 to BLUE (255, 0, 255), we get a purple color.
Check out this RGB color mixer or this color chart for RGB Decimal code for any color of choice.
from picozero import RGBLED
from time import sleep
rgb = RGBLED(red = 1, green = 2, blue = 3)
while True:
rgb.color = (255,0,0) #red color
sleep(0.5)
rgb.color = (0,255,0) #green color
sleep(0.5)
rgb.color = (0,0,255) #blue color
sleep(0.5)
rgb.color = (255,255,0) #yellow color