
Interfacing LCD Screen with Raspberry Pi Pico via I2C
Introduction
Screens are a fun way to communicate information and there are different types: Liquid Crystal Display LCD being one of them. LCD screens are found everywhere, from smaller sizes found electronic watches to larger versions in our Televisions. They have a big bright screen which can display text, numbers, and characters. There are various sizes used in embedded prototyping, such as 20x4 and 16x2, the later being most commonly used. the 16 represents the number of characters across the screen and 2 refers to the number of row in the screen.
In this tutorial, we'll see how to use the 16x2 LCD screen to display information from the Raspberry Pi Pico. We'll use an HD44780 LCD screen via an I2C adapter attached to the back of the screen to connect to the Raspberry Pi Pico programmed using MicroPython. You can connect the LCD to the Raspberry Pi Pico directly without the I2C adapter, but that will lead to wastage of microcontroller pins and also connection troubles. But with the I2C connected, we'll only need two pins (SDA and SCL) and power (VCC and GND) making a total of four pins.
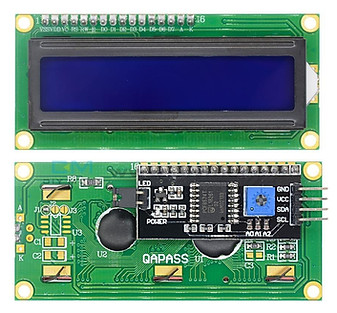
16x2 LCD (up), LCD with I2C adapter attached (down)
Hardware Components
-
Raspberry Pi Pico running MicroPython.
-
Breadboard.
-
Male-Female jumper wires (4).
-
16x2 LCD with I2C adapter attached.
Hardware Connection
-
Connect the GND on the I2C adapter to the GND on the Pico (Black wire).
-
Connect the VCC on the I2C adapter to the VBUS on the Pico (Red wire - 5v).
-
Connect the SDA on the I2C adapter to the SDA on the Pico (Blue wire)
-
Connect the SCL on the I2C adapter to the to SCL/SCK on the Pico (Purple wire).
-
Connect your Raspberry Pi Pico to your computer and open Thonny IDE.
.png)
Programming
-
Open your Thonny IDE.
-
We'll copy two program files by "tomshardware.com":
- Open this link and copy the text from the page - create a blank file in Thonny and paste the copied text into it. Save the file to the Raspberry Pi Pico as "lcd_api.py"
- For the second file, open this link and copy the text from the page - create a blank file and Thonny, as we did earlier, and paste the copied text. Save it to your Raspberry Pi Pico as "pico_i2c_lcd.py"
With the required libraries installed, we can now write scripts to test the library functions on our LCD.
-
Create a blank file and add the code as explained below:
-
We'll need to import four libraries. The first two are from the pre-installed Machine library, which will enable us to gain access to the Pico I2C and GPIO pins.
-
Next, we'll import the sleep function from Time to enable us pause the code when needed. Finally, we need to import the I2C library to help with interaction with the LCD screen.
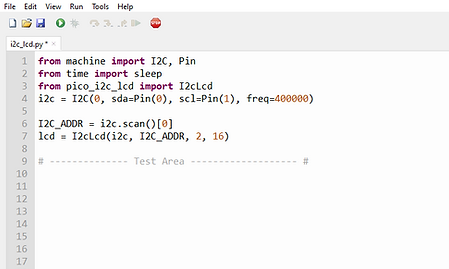
from machine import I2C, Pin
from time import sleep
from pico_i2c_lcd import I2clcd
-
Create an object i2c to communicate with the LCD screen over the I2C protocol. We will be using I2C channel 0, which maps SDA to GPIO0 and SCL to GPIO1.
i2c = I2C(0, sda=Pin(0), scl=Pin(1), freq=400000)
-
Create a variable I2C_ADDR, which will store the first I2C address found when we scan the bus. We only have one I2C device connected, so, we only need to see the first [0] address returned in the scan.
I2C_ADDR = i2c.scan()[0]
-
Create an object lcd to set up the I2C connection for the library. It tells the library what I2C pins we are using, set via the i2c object, the address of our screen, set via I2C_ADDR and finally it sets that we have a screen with two rows and 16 columns.
lcd = I2clcd(i2c, I2C_ADDR, 2, 16)
Now, you can map out the area under the above command for testing out the commands we'll be seeing below. Before testing any command of choice, clear previous commands in this area. You can comment to indicate as:
.png)
With our libraries imported and variables and objects initialized, add any of the commands below to test our library functionalities on the LCD:
You can choose to print the address on Thonny shell with the command below:
print(I2C_ADDR)
-
Turn on/off Backlight
We can turn on/off the LCD backlight with the simple commands below:
while True:
lcd.backlight_on()
sleep(1)
lcd.backlight_off()
sleep(1)
The commands above will turn on/off at 1 second interval in a loop.
Your LCD backlight should come on automatically when your Pico is powered and the above commands are absent from code.
-
Blink cursor
The command below will display the cursor on and off on screen:
lcd.blink_cursor_on()
-
Hide cursor
Sometimes, a flashing cursor can distract us from the main information being displayed. Luckily, we can turn off the cursor with the command below:
lcd.hide_cursor()
-
Display text
We can customize the information to be displayed on the screen as shown below:
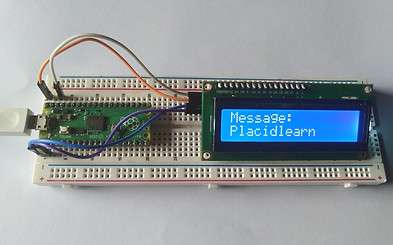
lcd.putstr("Placidlearn")
The command above will display "Placidlearn" on the LCD, with the first character
starting at the first index of the first row. To specify the row or column we want to display at, we can use the move_to(cloulmn, row) command to indicate where on the screen we wish to display our message, before actually specifying the message: We count our rows and columns beginning from 0.
lcd.move_to(2, 0)
lcd.putstr("Placidlearn")

The above command will display "Placidlearn" on the first row with first character "P" at the 3rd column.
-
Display two lines of text
We can simply display text on the first and second rows without using the move_to() command. But this will display on both rows with the first characters starting from the first column on each row. We can achieve this by adding the new line character (\n) to the first text, as shown below:
lcd.putstr("Message:"+"\n")
lcd.putstr("Placidlearn")
-
Display variable and string in single line
You can display a content stored in a variable (like an integer) along side a string with a single line command:
lcd.putstr("Number: "+str(number))
This will display "Number: 3" as output.
-
Clear the screen
We can clear any message currently being displayed on the screen with the simple command below:
lcd.clear()
You can apply this in a loop to clear screen after set period:
while True:
lcd.putstr("Placidlearn")
sleep(1)
lcd.clear()
The above command will display "Placidlearn" for a 1 second then clear the screen.