
Raspberry Pi Pico with OLED
OLED Display
An organic light-emitting diode (OLED or organic LED) is a flat light emitting technology, made by placing a series of organic thin films between two conductors. When electrical current is applied, a bright light is emitted, OLEDs are emissive displays that do not require a backlight and so are thinner and more efficient than LCD displays (which do require a white backlight).
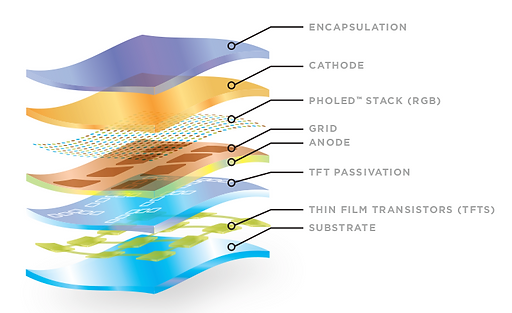
OLED Structure
OLEDs are used to create digital displays in devices such as television screens, computer monitors, and portable system such as smartphones and handheld game consoles. OLED displays also provide the best image quality and can also be made transparent, flexible, foldable and even rollable and stretchable in the future.

Since OLED display works without backlight and are thinner in size, it makes it suitable for portable embedded deices and also saves energy which is a major factor in embedded system development. The OLED displays can vary in sizes, shapes and color, but they are primary programmed in similar way.
In our previous tutorial, we looked at how to display test from the Pico using an LCD screen, here, we will be looking at how to interface an OLED display and how to display certain things.
SSD1306 OLED Display
Before we get to the main gist of this tutorial, let's look at the OLED display we'll be using. There are several types of OLED displays available in the market, for this tutorial, we'll be using an SSD1306 0.96-inch I2C OLED display. This display with the help of the SSD1306 controller uses I2C protocol to communicate with the microcontroller (although SPI can also be used in other modules). It also has 128x64 pixels.

SSD1306 0.96 inch OLED
The SSD1306 OLED comes with four pins labelled as VCC, GND, SCL, and SDA respectively. The VCC (3.3v-5v) and GND pins are for powering the display module, while SCL and SDA are for I2C communication with the microcontroller.
SSD1306 OLED Specifications
Interfacing OLED to Pico
Hardware Needed
-
Raspberry Pi Pico
-
SSD1306 0.96-inch 12C OLED display
-
Solderless breadboard
-
Male-Female jumper wires (x4)
OLED Wiring with Pico
You can connect the SCL and SDA pins of the OLED to any I2C pins of the Pico respectively, but we'll be using GP0 (I2C0 SDA) and GP1 (I2C0 SCL) in this tutorial.
Schematic
.png)
Programming
SSD1306 OLED MicroPython Library
Before we continue, we'll need to install the SSD1306 OLED MicroPython Library in Thonny:
-
Plug in your Pico to your computer
-
Open Thonny IDE.
-
Click on Tools > Manage Packages. (This should open the Thonny Package Manager)

-
In the search bar: type "ssd1306" then click 'Search on PyPi' (a new page should appear with different options)

-
Click on "micropython-ssd1306" (a new page should pop up), the click on "Install"

-
Click on "Close" after installation is complete. We are now set to program our OLED.

Code
from machine import Pin, SoftI2C
from ssd1306 import SSD1306_I2C
i2c = SoftI2C(sda = Pin(0), scl = Pin(1))
oled = SSD1306_I2C(128, 64, i2c)
oled.text("Welcome!", 0, 0)
oled.text("Testing OLED", 0, 16)
oled.text("It worked!", 0, 32)
oled.show()

How Code Works
Importing I2C and OLED Library
from machine import Pin, SoftI2C
from ssd1306 import SSD1306_I2C
We start by importing the Pins and I2C classes from the machine module.
Next, we'll import the SSD1306 I2C library we previously installed.
Initializing OLED
i2c = SoftI2C(sda = Pin(0), scl = Pin(1))
Next, we'll initialize the I2C() method, which specifies the two I2C GPIO pins for SDA and SCL, respectively. In this case, they are GPIO 0 (I2C0 SDA) and 1 (I2C0 SCL). This information is saved in the i2c object.
oled = SSD1306_I2C(128, 64, i2c)
Next, we create an object 'oled' of SSD1306_I2C which uses the width, height, and i2c object as parameter: our OLED for this tutorial is 128X64 (width = 128, height = 64)
Displaying text on OLED
To display text on the OLED, we'll use the text() function from the 'oled' object previously initialized. The text() function takes three arguments.
oled.text("Welcome!", 0, 0)
oled.text("Testing OLED", 0, 16)
oled.text("It worked!", 0, 32)
-
The first argument is the text we wish to display (e.g, "Welcome!")
-
The second argument is the column you want your first character to appear in.
-
Lastly, the row where you want your text to appear.
If you are displaying multiple texts on different rows, you should specify your rows by 16 to avoid text overlapping.
Lastly, we'll use the show() method from the 'oled' object to successfully display the messages on the OLED display.