
Raspberry Pi Pico With Ultrasonic Sensor

Introduction
When we think of measuring distance, a tool that comes to mind is a meter rule or measuring tape. The exciting news is that in this tutorial we will look at how to make an electronic device to calculate distance using Raspberry Pi Pico with an Ultrasonic sensor.
Requirements for this tutorial
-
Raspberry Pi Pico running MicroPython
-
Thonny IDE installed on your computer
-
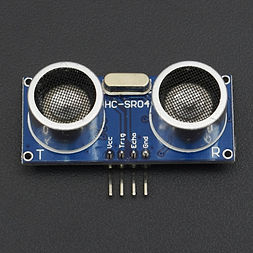
HC-SR04 Ultrasonic Sensor
-
Male - Male jumper wires (4)
-
Breadboard
Ultrasonic sensor (HC-SRO4)
An ultrasonic sensor is an electronic device that measures distance using ultrasonic waves. The sensor emits ultrasonic sound waves which bounce off objects in its path. The reflected sound wave is converted into an electrical signal. Ultrasonic waves travel faster than the speed of audible sound (i.e. the sound that humans can hear).
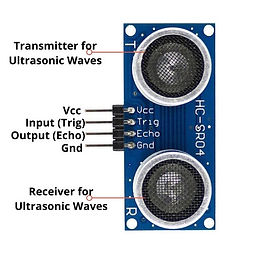
One of the commonly used ultrasonic sensors in embedded system prototyping is the HC-SR04 ultrasonic sensor, which we will be using in this tutorial. As shown in the image above, ultrasonic sensors consist of two main components: the transmitter (which emits the sound using piezoelectric crystals) and the receiver (which receives the sound wave reflected from an encountered obstacle).
Ultrasonic sensors know the distance between the sensor and obstacle by calculating the time it takes for the sound wave from the transmitter to get to the obstacle, bounce back and get to the receiver.
The formula for the above calculation is:
D = (T X C)/2
where:
D = distance
T = time
C = speed of sound (343.2 meter/second)
The HC-SR04 provides 2cm-400cm non-contact measurement function. It is inexpensive and easy to use.
Hardware Setup
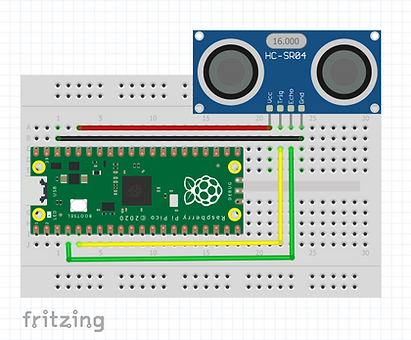
Now let's connect our previously listed hardware, which is: Raspberry Pi Pico, and HC-SR04 ultrasonic sensor, all assembled on a breadboard.
Connection
Schematic
.png)
Programming
We will be programming our Raspberry Pi Pico MicroPython, using Thonny IDE.
Brief description:
-
As we saw in the circuit above, the echo and trigger pins of the sensor are connected to pins GPIO 3 and 2 of the Pico respectively.
-
GPIO 3 (trigger) will be set to output - as this sends a pulse of current to the sensor to emit sound waves.
-
GPIO 2 (echo) is set to input - as this pin receives the reflected wave bounced off the obstacle.
-
Next, we'll calculate the time between emission and receipt of the sound wave to get our distance between the sensor and the obstacle.
Code:
1. Import the Pin class from the machine library and then the utime library, as shown below:
from machine import Pin
import utime
The Pin class is used for Pico GPIO pins control while the utime helps with time allocation in our program.
2. Create two new objects: trigger and echo then set corresponding Pins to input and output accordingly:
trigger = Pin(3, Pin.OUT)
echo = Pin(2, Pin.IN)
3. Create a function and name it ultrasonic(). This will contain the code needed to handle our sensor reading:
def ultrasonic():
4. Set trigger pin to low - ensure the pin is not active then pause for two microseconds:
trigger.low() utime.sleep_us(2)
5. Set trigger pin to high for five microseconds then set it to low:
trigger.high() utime.sleep_us(5) trigger.low()
6. Create a while loop to monitor the echo pin. This checks the amount of time the echo pin doesn't get a signal and then stores a timestamp in a variable called signalloff:
while echo.value() == 0: signalon = utime.ticks_us()
7. Create another while loop to monitor the echo pin. This will check the amount of time the echo pin gets signal and store a timestamp in a variable called signallon:
while echo.value() == 0: signalon = utime.ticks_us()
8. Create a new variable and name it timepassed, which will store the value total time taken for the pulse to leave the sensor, hit the object, and return back to the sensor as an echo:
timepassed = signalon - signaloff
9. Create a new variable named distance. This variable will store the answer to our earlier stated equation:
D = (T X C)/2
We multiply our time T (timepassed) by the speed of sound C (343.2 m/s, which is 0.0343 cm per microsecond) the product of that equation is divided by two as we do not need the total journey distance, just the distance from the object to the sensor.
distance = (timepassed * 0.0343) / 2
You can round off your result to two decimal places by adding the code below:
distance = round(distance, 2)
10. Print our result in the Thonny Shell:
print("Distance: ", distance, "cm")
11. Moving out of the function, we can now create a loop that will run the function every second.
while True:
ultrasonic()
utime.sleep(1)
Complete Code Listing
from machine import Pin
import utime
trigger = Pin(3, Pin.OUT)
echo = Pin(2, Pin.IN)
def ultrasonic():
trigger.low()
utime.sleep_us(2)
trigger.high()
utime.sleep_us(5)
trigger.low()
while echo.value() == 0:
signaloff = utime.ticks_us()
while echo.value() == 1:
signalon = utime.ticks_us()
timepassed = signalon - signaloff
distance = (timepassed * 0.0343) / 2
distance = round(distance, 2)
print("Distance: ", distance, "cm")
while True:
ultrasonic()
utime.sleep(1)
Save the code to the Raspberry Pi Pico, you can name it as "pico_ultrasonic.py" and click on the green arrow to run the code. In the Python Shell, you will see the distance printed every second.
.png)
This system can also be applicable as a motion or object detector; by detecting sudden changes in the distance in front of the sensor.