
Arduino Integrated Development Environment

Introduction
The companion to the Arduino hardware is the software, a collection of instruction of instructions that tells the hardware what to do and how to do it. To get the Arduino to be up and running, you actually need two types of software: The first is the Arduino integrated development environment (IDE) and the second is the Arduino sketch you create yourself.
The Arduino can also be programmed using C. In fact, the Arduino language is merely a set of C/C++ functions that can be called from your code. All standard C and C++ constructs supported by avr-g++ should work in Arduino (reference). These should not really bother you, as we will be coding with the Arduino sketch in this platform.
Arduino IDE
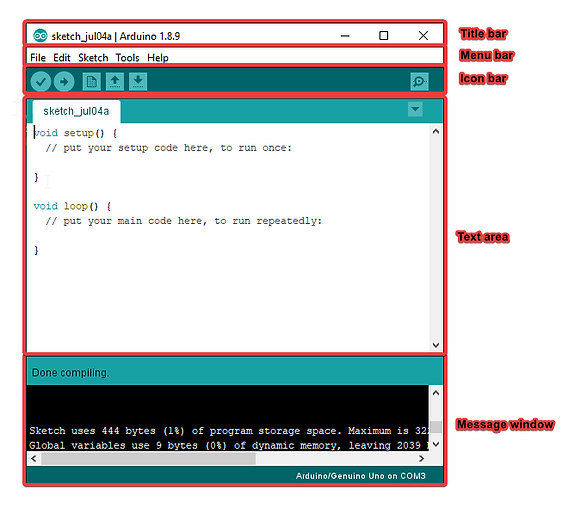
The IDE software is installed on your personal computer and is used to compose and send sketches to the Arduino board. As shown below, the Arduino IDE resembles a simple word processor. The IDE is divided into three main areas, the text area, and the message window area.
You can download the IDE from Arduino website.
Check for the installation instructions for your operating system.
Arduino IDE
Let us go through the different sections of the Arduino IDE.
The Command Area
The command area is shown at the top of the figure above. It includes the title bar, menu items, and icons. The title bar displays the sketch’s filename (sketch_jul04a), as well as the version of the IDE (Arduino 1.8.12). below this is a series of menu items (File, Edit, Sketch, Tools, and Help) and icons, as described below.
Menu Items
Just as any word processor or text editor, you can click on any of the menu items to view its various options.
File – Contains the open, save, and close sketches options. You can also click on the ‘Example’ option to view a thorough set of example sketches: as well as the Preferences sub-menu.
Edit – Contains the usual copy, paste, undo, redo functions common to any word processor.
Sketch – Contains the function to verify/compile your sketch, upload to upload your sketch to the board, and some sketch folder and import options.
Tools – Contains a variety of functions as well as the commands to select the Arduino board type and USB port.
Help – Contains links to various topics of interest and the version of the IDE.
The Icons
Below the menu toolbar are six icons. Hover your mouse over each icon to display its name. The icon from left to right, are as follows:
Verify – Click on this icon to check that your Arduino sketch is valid and doesn’t contain any programming mistakes.
Upload – Click on this icon to verify and then upload your sketch to the Arduino board.
New – Click on this icon to open a new blank sketch in a new window.
Open – Click on this icon to open an existing sketch.
Save – Click this to save an open sketch. If the sketch is new and doesn’t have a name, you will be prompted to create a name for the sketch.
Serial Monitor – Click this icon to open a new window to view data transfer between your Arduino and the IDE.
The Text Area
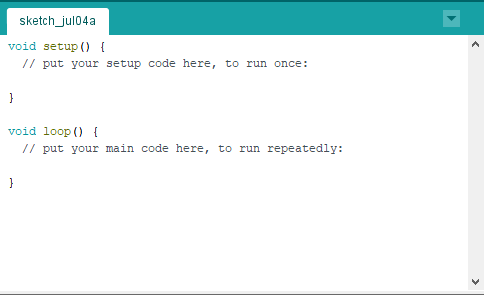
The text area is located at the middle of the IDE window. This is were you’ll create your sketches. The name of the current sketch is displayed in the tab at the upper left of the text area. (The default name is the current date.) This is were you will enter the content of your sketch.
The Message Window Area
The message window area is shown at the bottom of the IDE window. Messages from the IDE appear in the black area. The messages you see will vary and will include messages about verifying sketches, status updates, and so on. At the bottom right of the message area, you should see the name of your Arduino board type as well as its connected USB port—Arduino/Genuino Uno on COM3 in this case.
Arduino Sketch
Here, we'll quickly look at how to create and run our sketch in the Arduino IDE.
An Arduino sketch is a set of instructions that you create to carry out a particular task; in other words, a sketch is a program. In this section you’ll write and upload a simple sketch that will cause the LED on the Arduino (labeled L) to blink repeatedly, turning it on and off for 1-second intervals.
At this point, if you don't understand how the Arduino sketch works, you are safe; as we will go deeper into the workings and structure of the Arduino sketch in our next topic on Arduino Programming.
The Arduino IDE includes a large collection of built-in examples sketches that you can load up and use. Open the IDE, click on 'File > Example', then you can select any sample sketch of your choice.
To create your new sketch in the IDE, go to the menu bar, click File > New. A new Arduino IDE window will pop-up. Copy the sample sketch below then save. To save your sketch, go to the menu bar, click on File > Save; the explorer window will pop-up, select the location to store your file.
If you make any changes to your sketch after saving, remember to save again; as Arduino IDE does not have auto-save functionality.
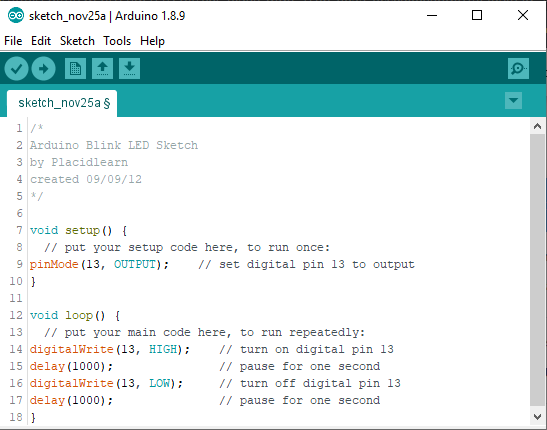
Sample Arduino sketch
Verify Your Sketch
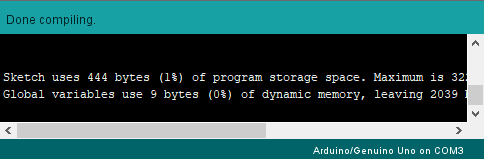
After you are done writing and saving your sketch, you need to verify your sketch. Verifying your sketch helps to ensure that it has been written correctly in a way that the Arduino can understand. To verify your complete sketch, click Verify in the IDE and wait a moment. Once the sketch has been verified, a note should appear in the message window, as shown below:

This 'Done compiling' message tells you that the sketch is okay to upload to your Arduino. It also shows how much memory it will use (930 bytes in this case) of the total available on the Arduino (32,256 bytes). But what if your sketch isn’t okay? Say, for example, you forgot to add a semicolon at the end of the second delay(1000) function. If something is incorrect in your sketch, then when you click Verify, the message window should display a verification error message similar to the one shown below:
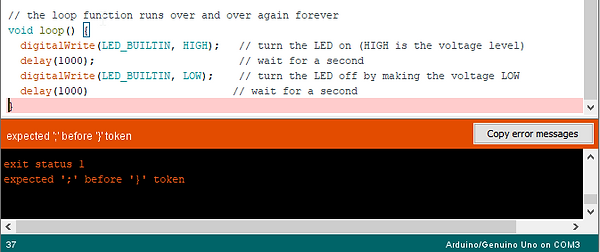
The message tells you that the error occurs in the void loop function, and displays the error itself (the missing semicolon, error: expected ';' before '}' token). Furthermore, the IDE should also highlight in pink the location of the error or a spot just after it. This helps you easily locate and rectify the mistake.
Uploading and Running Your Sketch
Once you’re satisfied that your sketch has been entered correctly, save it, ensure that your Arduino board is connected, and click Upload icon in the IDE. The IDE may verify your sketch again and then upload it to your Arduino board. During this process, the TX/RX LEDs on your board should blink, indicating that information is traveling between the Arduino and your computer.
Your Arduino should start running the sketch. If you’ve done everything correctly, then the LED on your board labeled L should blink on and off once every second!
You now know the basics of how to enter, verify, and upload an Arduino sketch.
The Serial Monitor
We use external peripherals such as LEDs, LCDs, and other forms of displays to show the output results and feedback from our Arduino. Blinking lights and small screens can tell us only so much. In this section, we'll learn how to use the Arduino's cable connection and the IDE's Serial Monitor window to display data from the Arduino and also to send data to the Arduino from the computer keyboard.
To open the Serial Monitor, open the IDE and click the Serial Monitor icon button on the tool bar. Th e Serial Monitor should open and look similar to the figure below.

As you can see in the figure above, the Serial Monitor displays an input field at the top, consisting of a single row and a Send button, and an output window below it, where data from the Arduino is displayed. When the Auto-scroll box is checked, the most recent output is displayed, and once the screen is full, older data rolls off the screen as newer output is received. If you uncheck Auto-scroll, you can manually examine the data using a vertical scroll bar.
Starting the Serial Monitor
Before we can use the Serial Monitor, we need to activate it by adding the Serial.begin() function to our sketch in void setup():
Serial.begin(9600);
The value 9600 is the speed at which the data will travel between the computer and the Arduino, also known as baud rate. This value must match the speed setting at the bottom right of the Serial Monitor, as shown in Figure above.
Sending Text to the Serial Monitor
To send text to the Serial Monitor to be displayed in the output window, you can use Serial.print. (the Serial.print function prints data as a human-understandable ASCII text).
Serial.print("Arduino for Everyone!");
This sends the text between the quotation marks to the Serial Monitor’s output window. You can also use Serial.println() to display text and then force any following text to start on the next line:
Serial.println("Arduino for Everyone!");
Displaying the Contents of Variables
You can also display the contents of variables on the Serial Monitor. For example, this would display the contents of the variable results:
Serial.println(results);
If the variable is a float, the display will default to two decimal places. You can specify the number of decimal places used as a number between 0 and 6 by entering a second parameter after the variable name. For example, to display the float variable results to four decimal places, you would enter the following:
Serial.print(results, 4);
Debugging with the Serial Monitor
The Serial Monitor can be useful in debugging (locate and fix errors) in your sketch. For example, if you insert Serial.println() statements in your sketch containing brief notes about the location in the sketch, then you can see when the Arduino passes each statement.
Libraries
In the world of Arduino, libraries are a collection of code that makes it easier to interact with external peripherals connected to the Arduino such as sensors, displays, modules, etc.
The Arduino IDE includes a number of built-in libraries such as the LiquidCrystal library which makes it easy to talk to LCD displays. There are many Arduino libraries available online that you can download and use for your projects.
Once you've downloaded the libraries, you'll need to install them on your computer.
To install a library in Arduino version 1.0.6 and higher, follow these steps:
-
On your IDE, click on Sketch > Include Library > Add .Zip Library.
-
Your file explorer window will pop up, browse to the ZIP file you downloaded and select it.
You can add a command that borrows code from the library. Libraries are listed at the
start of a sketch and are initialized using the '#include' command. Libraries are
surrounded by angle brackets, '<>' and end with '.h' as shown below with the call of
the Servo library:
Syntax: #include<>
Example: #include <Servo.h>