Raspberry Pi Programming with MicroPython


Updated: Feb. 2025
Introduction
As discussed in the previous module, Raspberry Pi Pico can be programmed with different programming languages, MicroPython being one of them. MicroPython is a full implementation of the Python 3 programming language that runs directly on embedded hardware like the Raspberry Pi Pico.
To get started, we'll need Thonny IDE. Thonny is an integrated development environment for Python that is designed for beginners.
What we'll learn
In this tutorial, we'll learn how to:
-
Download and configure the Thonny IDE.
-
Download and install the MicroPython firmware on our Raspberry Pi Pico board.
What we'll need
For this tutorial, we'll need the following:
-
A Raspberry Pi Pico or Pico W board.
-
Micro USB cable.
-
A PC or Mac to run Thonny IDE.
-
Internet connection.
Now, let's get into it...
Install Thonny
-
Head to the Thonny website and download the Thonny version for your OS. (We'll be using a Windows PC for this tutorial.)
.png)
Thonny website
At this point, we assume you have successfully installed Thonny on your computer.
Open your newly installed Thonny IDE and you should see a similar screen to the one below:

Thonny IDE launch screen
Adding MicroPython firmware to the Pico
If you have never used MicroPython on your Raspberry Pi Pico, you will need to add the MicroPython firmware. There are two ways we can do this:
-
The first way is by dragging and dropping a downloaded UF2 file onto the Pico board using our PC.
-
The second method is by downloading the file to our Pico through the Thonny IDE.
1. Drag-and-Drop Method
A downloadable UF2 file has been made available to let you install MicroPython more easily, with the following steps below:

raspberrypi.org
Steps:
1. Using your PC, download the MicroPython UF2 file from the Raspberry Pi website. Scroll down the webpage to where you have the download option as shown below:

Select for the Pico board version you have

Downloaded file
2. Connect one end of the micro USB cable to the Pico.
3. Find the BOOTSEL button on your Raspberry Pi Pico. Press the BOOTSEL button and hold it while you connect the other end of the micro USB cable to your computer.
Release the BOOTSEL button after your Pico is connected.


2
3
4. It will mount as a Mass Storage Device called RPI-RP2.
5. Drag and drop the previously downloaded MicroPython UF2 file from your downloads folder onto the RPI-RP2 volume. Your Pico will reboot. You are now running MicroPython on your Pico.

6. Unplug the USB cable from your computer and plug it back in (restart Pico board)
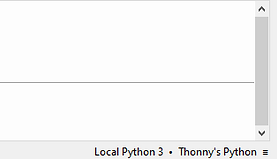
7. Go back to your Thonny window, in the bottom right-hand corner, you will see the version of Python that you are currently using. Click on the Python version and choose 'MicroPython (Raspberry Pi Pico)'
.png)
If the above steps are successful, subsequent times, you can just plug your Pico into your computer and it should automatically be ready for use.
2. Download firmware with Thonny IDE
Follow the steps below to download MicroPython firmware onto your Raspberry Pi Pico or Pico W:
1. Open your Thonny IDE.
2. Press and hold the BOOTSEL button on your Pico, and connect your Pico to your PC.
3. Go to the bottom-right corner of your Thonny IDE screen (you should see the version of Python installed on your PC if any). Click on it and you should see a pop-up window:
.png)
.png)
Step 3
4. Since there is no firmware on your Pico, you should see options to install from. Click on Install MicroPython. You should get a bigger window to select the MicoPython version for your board of choice.
.png)
Step 4
5. Select the firmware variant according to the board you have plugged in, then click on Install (Your firmware should start downloading).
.png)
Step 5
6. When the download is complete, click on Close to exit the window. You now have MicroPython installed on your Pico!
.png)
Step 6
7. Click on the bottom-right corner of the Thonny browser once again: you should see MicoroPython as installed Python options to choose from.
.png)
Step 7
