
ESP32 Programming With MicroPython

Introduction
As highlighted in the introductory module of this tutorial, MicroPython is listed as one of the various programming languages the ESP32 board can be programmed with.
MicroPython is a lean and efficient implementation of the Python 3 programming language that includes a small subset of the Python standard library and is optimized to run on microcontrollers and in constrained environments.
MicroPython is full of advanced features such as interactive prompts, arbitrary precision integers, closures, list comprehension, generators, exception handling, and more. Yet it is compact enough to fit and run within just 256k of code space and 16k of RAM.
What we will learn
-
Download MicroPython firmware.
-
Flash firmware into ESP32 board.
-
Download Thonny IDE.
-
Program ESP32 onboard LED to blink using MicroPython in Thonny IDE.
Requirements for this tutorial
Required Hardware
-
ESP-WROOM-32 Board
-
Micro USB cable
Required Software
-
Thonny IDE
-
MicroPython firmware for ESP32
-
For the sake of this tutorial (we'll be using Windows10 OS)
Download MicroPython Firmware
-
Let's head to the MicroPython downloads page to download the firmware for ESP32.
-
On the new page, scroll down to where you have the "Firmware" and click on the latest option to download (at the time of this writing the latest release is v1.191.1).
-
You can check your downloads folder to confirm the file has been successfully downladed.
Before we continue in our endeavor to flash our newly downloaded MicroPython firmware to our ESP32, we need the "esptool" to clear our ESP32 flash memory and also for moving our firmware into the cleared memory space.
Install esptool
The esptool is a Python file. So, you need Python 2.7, Python 3.4, or a newer version installed on your computer to be able to install and run it.
With Python installed, you can download the tool from the official esp repo and download the latest stable release of esptool.py or open a Terminal window on your computer to install it via pip command.
Open your terminal window and run the following command:
pip install esptool
If the above doesn’t work, modify it to any of the commands below and try again.
pip3 install esptool
python -m pip install esptool
"pip install esptool" simply worked for me.
Once the installation is done, you can launch the esptool by entering the following command in the terminal.
esptool
.png)
Clear ESP32 Flash Memory
To get the best result, it is recommended that we clear the flash memory of our ESP32 board before putting in our new MicroPython firmware.
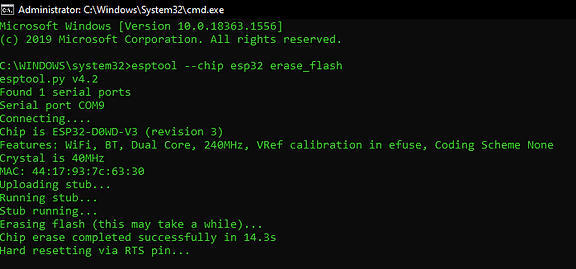
To do this, hold down the boot/flash button on your ESP32 and run the command;
esptool --chip esp32 erase_flash
As soon as the process begins, you can remove your hand. The ESPtool will automatically identify the port on which your ESP32 is located.
You should see a screen similar to the one below when the process is completed.
.png)
If it gets stuck on the dots after the connecting, it means your board was not in boot/flash mode and you will need to try again.
Flash MicroPython Firmware To ESP32 Board
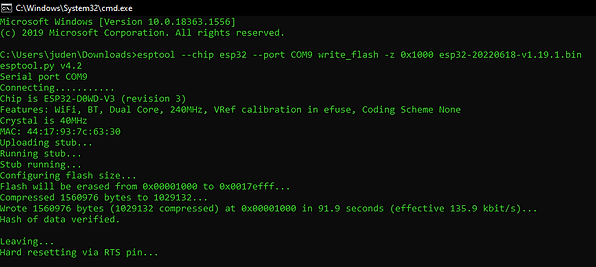
With our board completely erased, we can now flash the board with the new firmware by running the command below:
sample command:
esptool.py --chip esp32 --port <serial_port_your_board_is_connected> write_flash -z 0x1000 <bin_file_location>
Fill the spots in the command with your serial port and the location of the bin file we downloaded earlier.
To make things easier, you can just open the terminal in the same folder as your downloaded firmware so you only have to enter only the name of the file without adding the location.
the command I used:
esptool --chip esp32 --port COM9 write_flash -z 0x1000 esp32-20220618-v1.19.1.bin
.png)
With this done, you should see remarks indicating that your board has been successfully flashed with the MicroPython Firmware and you should be able to program the board using any python IDE.
.png)
Installing Thonny
If you have worked with ESP32 before, you probably have been programming using Arduino IDE. For this tutorial, since we are working with MicroPython, we'll be using Thonny IDE for programming.
Now let's download our IDE:
-
Head over to the Thonny website and download the Thonny version for the operating system you are using.
-
Click on the downloaded .exe file and follow the instructions to install.
-
Once you Thonny IDE has been sucessfully installed, launch the Thonny IDE and you should see a screen similar to the one below:

To program our ESP32 board with MicroPython in Thonny IDE, the interpreter needs to be set to MicroPython.
You can do this by going to Tools > Options > MicroPython (ESP32).
.png)
.png)
The port your board is connected to should be detected automatically or you can select it yourself if it doesn't.
Blink ESP32 builtin LED with MicroPython
If you are reading this post, I'll assume you will run MicroPython on your ESP32 for the first time. As hardware tradition demands ...lol, we begin by blinking LED.
Let's write a MicroPython program to turn "on" and "off" the LED on our ESP32 board with a delay of your choice.
Create a new file in Thonny and input the code below:
from machine import Pin
from time import sleep
led = Pin(2, Pin.OUT)
while True:
led.on()
sleep(0.5)
led.off()
sleep(0.5)
To run our code, simply click on the green play button at the top of Thonny IDE.
The IDE will prompt us to save our file on our computer (PC) or inside the ESP32 Board. We'll save to our ESP32 with the name "blink.py" and we should see the LED on our board blink in the half-a-second intervals.
Workings of the code
We start by importing the modules to be used for the script, which in our case, are the Machine and time modules.
from machine import Pin
from time import sleep
Pin helps us address specific GPIOs while sleep helps us introduce pauses like the delay() function in Arduino.
Next, we set the pin status as output similar to what we do with the Arduino pinMode() function. The built-in LED is connected to pin 2 of the ESP32.
led = Pin(2, Pin.OUT)
Finally, we write the while loop. This is similar to the void loop() function on Arduino.
while True:
led.on()
sleep(0.5)
led.off()
sleep(0.5)
Here we turn “on” the LED for 0.5 seconds and turn it “off” for another 0.5 seconds.