
Arduino Digital Output (LED)
Introduction
We discussed Arduino digital input signal in our last module and how we can read digital input signals from a Push-button. In this module, In this module, we will be focussing on Arduino digital output signal. We will demonstrate this by sending out digital signals from Arduino to turn on/off LED connected to it.
At the end of this module, we should be able to combine our knowledge from the previous module and the one we're about to get here to make a simple circuit that will get input commands from push button, process with Arduino then send out output commands to turn on/off LED.
Light Emitting Diode (LED)
You can use an LED for a simple indicator, such as blinking when a particular condition is satisfied. Previously, we discussed how to blink the in-built LED on the Arduino Uno board. We'll be sending digital signals (i.e. 1/0) to turn on/off an LED respectively. Now, let's learn how to control an LED connected to any of the GPIO pins of the Arduino.
Required components for this tutorial:
-
Arduino UNO R3
-
Compatible USB cable
-
LED
-
220 ohms resistor
-
Solderless breadboard
-
Jumper wires
-
Push button
Circuit
-
Plug your LED into a breadboard.
-
Connect the shorter leg of the LED to the GND pin of Arduino.
-
Connect one leg of a 220 ohms resistor to the longer leg of the LED then connect the other leg of the resistor to pin 13 of Arduino.
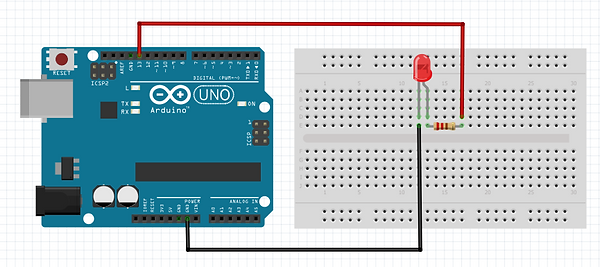
Circuit diagram
Arduino code
//initialize the pin your LED is connected to
const int ledPin = 13;
void setup() {
pinMode(ledPin, OUTPUT); //set ledPin to send output signal
}
void loop() {
digitalWrite(led, HIGH); //turn LED on
delay(1000); //wait for one second (1000 milliseconds)
digitalWrite(led, LOW); //turn LED off
delay(1000); //wait for one second (1000 milliseconds)
}
How code works
-
First, we indicate the pin our LED is connected to which in our case is digital pin 13.
-
Next, inside our setup function, we use the pinMode() function to initialize that our connected pin 13 would act as output to our LED.
-
Finally, in our loop function, we use digitalWrite() function and passing parameters; led, HIGH, and LOW respectively. HIGH tells the Arduino to send digital signal 1 to pin 13, and signal 0 if low, then pause for 1 second intervals respectively.
Controlling LED with the input signal from Pushbutton
Required components
-
Arduino UNO R3
-
Resistors (220ohms x 2)
-
Push-button
-
Solderless breadboard
-
Jumper wires
-
LED

Circuit diagram
Arduino code
const int buttonPin = 2; //connect button to pin 2
const int ledPin = 13; //connect led to pin 13
void setup(){
pinMode(buttonPin, INPUT_PULLUP); //set button pin as input
pinMode(ledPin, OUTPUT); //set led pin as output
}
void loop(){
if(digitalRead(buttonPin) == HIGH){ //if button is pressed
digitalWrite(ledPin, HIGH); //turn on led
}
else{
digitalWrite(ledPin, LOW); //button released - turn off led
}
}