
Arduino with Buzzer
Buzzers
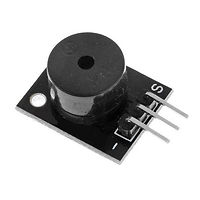
Buzzer is an electrical device that makes a buzzing noise and is used for signalling.
Electronic buzzers are DC-powered and equipped with an integrated circuit. They are widely used in computers, alarms, timers, printers and other electronic products for voice devices. Buzzers can be categorized as active and passive buzzer.
If you turn the two buzzers with the pins facing up, the one with a green circuit board is a passive buzzer, while the other enclosed with a black tape or plastic is an active buzzer.
.png)
1.Passive Buzzer 2.Active Buzzer
Passive Buzzer

Active Buzzer
Active Buzzer
The difference between the two is that an active buzzer has a built-in oscillating source, so it will generate a sound when powered. A passive buzzer does not have such so it makes no sound if powered; instead, you need to use square waves whose frequency is between 2K and 5K to drive it. The Arduino makes the process very easy using libraries. Let's look at how to use the active buzzer to get sound feedback from the Arduino.

Active Buzzer Schematic
Active Buzzer Sketch
int buzzer = 12; //connect active buzzer to pin 12
void setup(){
pinMode(buzzer, OUTPUT); //initialize the buzzer pin as an output
}
void loop(){
unsigned char i;
while(1)
{
//output an frequency
for(i=0;i<80;i++)
{
digitalWrite(buzzer, HIGH);
delay(1);//wait for 1ms
digitalWrite(buzzer, LOW);
delay(1);//wait for 1ms
}
//output another frequency
for(i=0;i<100;i++)
{
digitalWrite(buzzer,HIGH);
delay(2);//wait for 2ms
digitalWrite(buzzer,LOW);
delay(2);//wait for 2ms
}
}
}
First we indicate the pin our active buzzer is connected to which in our case is pin 12. Next, inside our setup function, we use the pinMode() function to initialize that the connected pin would act as output to our buzzer. Next, in our loop function we make use of the while loop. Before then, we declare an unsigned datatype char which encodes numbers from 0 to 255. Going back to our while loop, it will loop continuously, until the expression inside the parenthesis, () becomes false. Inside the while loop we use a for loop to set our frequency. Upload your sketch above to your Arduino and listen to your Arduino beep at intervals.
Passive Buzzer
As mentioned earlier, a passive buzzer does not make sound if powered; instead, you need to use square waves whose frequency is between 2K and 5K to drive it. The Arduino makes the process very easy using libraries. The active buzzer is often more expensive than the passive one due to built-in oscillating circuits. Let's look at how to use the passive buzzer get sound feedback from the Arduino.
The working principle of passive buzzer is using PWM generating audio to make the air to vibrate. Vibrating at different frequencies you can generate different sounds. For example, sending a pulse of 523Hz, it can generate Alto Do, pulse of 587Hz, it can generate midrange Re, pulse of 659Hz, it can produce midrange Mi. By the buzzer, you can play a song.
Here we will generate eight different sounds, each sound lasting 0.5 seconds: from Alto Do to Treble Do.
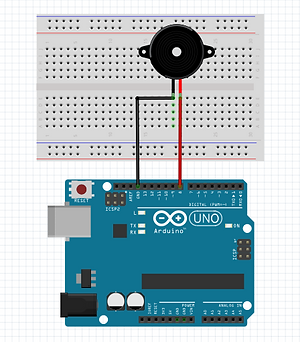
Passive Buzzer Schematic
Passive Buzzer Sketch
#include "pitches.h"
// notes in the melody:
int melody[] = {NOTE_C5, NOTE_D5, NOTE_E5, NOTE_F5, NOTE_G5,
NOTE_A5, NOTE_B5, NOTE_C6};
int duration = 500; // 500 miliseconds
void setup() {
}
void loop() {
for (int thisNote = 0; thisNote < 8; thisNote++) {
// pin8 output the voice, every scale is 0.5 sencond
tone(8, melody[thisNote], duration);
// Output the voice after several minutes
delay(1000);
}
// restart after two seconds
delay(2000);
}
Download and install the "pitches.h" file for the code to run. Looking at our sketch, we begin by adding our additional file "pitches.h". This sketch file contains all the pitch values for typical notes. For example, NOTE_C4 is middle C, NOTE_FS4 is F sharp, and so forth. This note table was originally written by Brett Hangman, on whose work the tone() command was based. You can download this file here.
Next, inside our setup function we create an array containing the notes we wish to play in this project and declare the tone duration (how long each tone will play) which in this case is 500 milliseconds.
Moving inside the loop function, we use a for loop to give the command that the program should run through the array and start playing the notes (thisNote) with a scale of 0.5 second, starting from index 0 and increments till it gets to the seventh. This is done using the in-built function "tone", passing the parameters; 8 which is the total number of tones, melody array with the parameter (thisNote), then the duration, with 1 second delay between each note, and when it gets to the last note, takes 2 seconds delay and start over.